How to Remove Bike Pedals with a Hex Wrench
Remove hex-socket bike pedals with the exact-size wrench, full tool engagement, correct left and right thread directions, and a stable crank position.
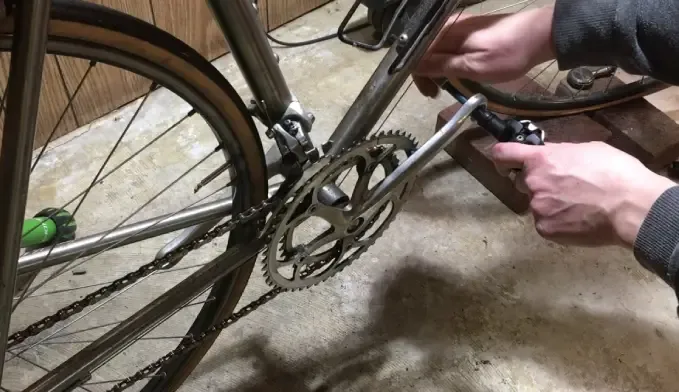
To remove a bike pedal with a hex wrench, insert the exact-size wrench fully into the socket on the inboard end of the pedal spindle. Viewed from outside the bike, loosen the right pedal counterclockwise and the left pedal clockwise.
Confirm that the pedal uses an internal hex
Look at the end of the pedal spindle where it passes through the crank. Some pedals have a 6 mm or 8 mm hex socket, but sizes vary. Others require a 15 mm pedal wrench on flats beside the crank, and some offer both interfaces.
Do not choose a tool by a general rule. Test clean, undamaged metric hex keys and use the one that seats completely without play. A long-handled L-key or hex bit approved for the task gives better control than a small folding multitool.
Set the crank and wrench position
Stabilize the bike. Shift the chain onto the largest front ring if that safely covers sharp teeth. Position the crank horizontally or at another angle that lets you apply force smoothly while keeping the wrench fully engaged.
Remember the thread directions:
- Right pedal: loosen counterclockwise when viewed from the right side.
- Left pedal: loosen clockwise when viewed from the left side.
Park Tool’s pedal installation and removal guide shows both directions and explains the different wrench interfaces.
Remove the pedals
- Identify the right or left pedal before applying force.
- Insert the hex wrench through the back of the crank into the spindle.
- Hold the crank securely without clamping or crushing it.
- Apply steady pressure in the correct loosening direction.
- When the threads release, continue turning while supporting the pedal.
- Label the pedals left and right if their markings are hard to see.
The wrench is on the back of the crank, which can make the apparent direction confusing. Think about the spindle’s rotation as seen from the pedal side, not merely which way your hand moves.
If the pedal is seized
Do not hit the wrench, stand on it, or use uncontrolled heat. Recheck direction and tool fit. Use penetrant only if the crank and pedal makers approve that product for their materials and finishes.
Move to the stuck-pedal guide for a conservative escalation sequence. If the socket is damaged or controlled leverage does not work, a bicycle shop can remove the crank or pedal without risking a sudden slip.
Clean and reinstall
Inspect the pedal and crank threads. Start each pedal by hand in its matching crank. It should turn several threads without binding. Apply the specified grease, anti-seize, or other preparation and tighten to the exact manufacturer’s value.
Replace a pedal with damaged threads, a bent spindle, bearing play, or a cracked body. The current mountain-bike pedal guide compares flat and clip-in options, while Shimano pedal removal covers brand-specific procedures. For suitable hex tools, see how to build a bike tool kit.
This procedure is research-based and does not assume one wrench size or torque for every pedal.