How To Adjust Shimano Front Derailleur?
Adjust a mechanical Shimano front derailleur in the correct order: verify compatibility and position, set the low limit, cable tension, high limit, then test.
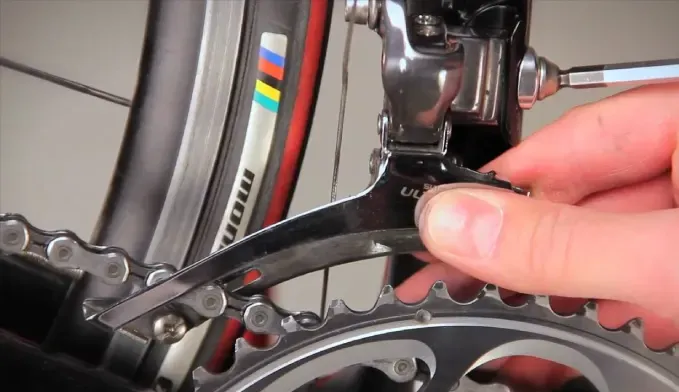
Table of Contents
- Identify the system before adjusting it
- Check the bike before turning a screw
- Diagnose the symptom before adjusting
- Step 1: Set derailleur height and rotation
- Step 2: Set the low limit
- Step 3: Route and tension the cable
- Step 4: Set the high limit
- Step 5: Fine-tune cable tension and trim
- Step 6: Test every intended shift
- Frequently asked questions
- Bottom line
Adjust a mechanical Shimano front derailleur only after identifying the exact model and reading its dealer manual. The usual order is compatibility and condition, derailleur position, low limit, cable routing and tension, high limit, then shift testing. Do not use a generic screw-turning sequence for Shimano Di2 or for a model whose manual specifies a different setup.
Stop if the derailleur, hanger or mount, chainring, cable, frame, or shifter is damaged. A limit screw set too far out can let the chain fall off a chainring and damage the frame or cause a loss of control.
Identify the system before adjusting it
Find the model number printed or stamped on the derailleur, then look it up in Shimano Product Information. Shimano’s road, mountain, gravel, double-chainring, triple-chainring, side-swing, toggle-link, and electronic systems do not all use the same cable route or adjustment procedure.
This guide covers the general logic of a cable-operated front derailleur. Use the exact Shimano dealer manual for:
- Mounting height and angle
- Support-bolt or backup-plate requirements
- Cable-routing mode
- Clamp and cable-fixing torque
- Limit-screw identification
- Trim positions
- Model-specific setup marks or indicators
If the bike has only one front chainring, it does not need a front derailleur adjustment.
Check the bike before turning a screw
A derailleur cannot compensate for incompatible or worn parts. Confirm:
- The shifter, derailleur, crankset, chainring count, chain, and rear speeds are compatible
- The derailleur cage is not bent
- Chainrings are not bent or severely worn
- The chain is the correct type and is not excessively worn
- The cable and housing move freely and are routed correctly
- The derailleur mount is secure
- The rear derailleur and hanger are working well enough to test all gear combinations
Clean a dirty drivetrain before diagnosing rubbing. Our guide to cleaning a bike chain covers a safe surface-cleaning method.
Diagnose the symptom before adjusting
| Symptom | Likely areas to check first |
|---|---|
| Chain will not reach the large ring | Cable tension and routing, derailleur position, then high limit |
| Chain falls toward the frame | Low limit, derailleur position, mounting security |
| Chain overshifts to the outside | High limit, cage alignment, cable tension |
| Rub in only one extreme gear | Cross-chaining or a missed trim position |
| Rub through much of the cassette | Height, rotation, bent cage, or cable tension |
| Shift force is unusually high | Corroded cable, damaged housing, wrong routing, or incompatible parts |
This table identifies where to inspect, not which screw to turn. Use the exact model manual before changing a limit or cable-fixing point.
Step 1: Set derailleur height and rotation
Position comes before the limit screws. Park Tool’s front derailleur adjustment guide explains that the basic variables are height, rotation, limit screws, and cable tension.
Many traditional mechanical derailleurs place the lower edge of the outer cage plate roughly 1 to 2mm above the tallest teeth of the large chainring, with the cage approximately parallel to the chainring. That is a general reference, not a substitute for the Shimano model manual. Some modern Shimano designs use alignment marks, a support bolt, or a preset mounting plate.
Loosen a derailleur clamp only enough to adjust it. Follow the frame and derailleur torque limits, especially on a carbon frame. If a support plate is required, install it exactly as shown by Shimano.
Step 2: Set the low limit
The low limit stops the cage from moving too far toward the frame. Start with the chain on the smallest front chainring and a rear sprocket specified by the Shimano manual.
Release cable tension enough that the derailleur can rest against its low stop. Then:
- Identify the low-limit adjustment from the model manual.
- Pedal the bike by hand on a stable repair stand.
- Adjust in small increments.
- Leave the model-specified clearance between the chain and inner cage plate.
- Shift away from and back to the small ring to verify the chain does not fall inward.
Do not assume every screw marked H or L moves the cage in the same visually obvious direction. Watch the cage as you make each small adjustment.
Step 3: Route and tension the cable
Confirm that the cable follows the correct side of every guide, washer, groove, and fixing bolt. Shimano manuals often show more than one routing or converter position, and the wrong route changes leverage.
Set any barrel adjuster to the starting position in the manual. Pull the cable only to the specified initial tension, secure it to the stated torque, and trim or cap it correctly. Excess tension can prevent the derailleur from resting on the low limit.
If the cable is rusty, frayed, kinked, or drags in the housing, replace it before continuing. More barrel adjustment will not repair a damaged cable.
Step 4: Set the high limit
The high limit stops the cage from moving beyond the large chainring. Shift to the large front ring using the rear sprocket position specified by the model manual.
Adjust in small increments while turning the cranks by hand. The goal is reliable movement onto the large ring without throwing the chain to the outside. Keep enough outer-cage clearance to avoid unnecessary rub in the intended test gear.
If the chain will not reach the large ring, first determine whether the cause is insufficient cable tension, incorrect routing, poor derailleur position, or a restrictive high limit. Do not keep backing out the high-limit screw without checking those variables.
Step 5: Fine-tune cable tension and trim
Use the barrel adjuster only after the limits and mounting position are close. Increase or decrease tension in small steps and test the shift in both directions.
Some Shimano road shifters have trim positions that move the front derailleur slightly to reduce chain rub. A small amount of rub in an extreme cross-chain combination may be a gear-selection issue, not a reason to move the limit screw.
Avoid riding in combinations that place the chain at a severe angle, such as the large front ring with the largest rear sprocket or the small front ring with the smallest rear sprocket, unless the drivetrain maker explicitly supports them.
Step 6: Test every intended shift
Turn the cranks and shift repeatedly between the front chainrings while moving through the normal rear-gear range.
Check that:
- The chain does not fall toward the frame
- The chain does not overshift beyond the large ring
- Shifts occur without excessive force
- The cage does not contact a chainring
- Cable housing remains fully seated
- The derailleur and mount do not move
Finish with a cautious low-speed ride away from traffic. Stop for chain drop, grinding, a moving derailleur, or shifting that requires unusual lever force.
For broader shifting diagnosis, use our guide to adjusting bicycle gears. If the job needs cable cutters, torque tools, or several specialty tools, our bike tool-kit guide can help identify them.
Frequently asked questions
Why will my Shimano front derailleur not shift to the big ring?
Common causes include insufficient cable tension, incorrect cable routing, a restrictive high limit, poor derailleur position, incompatible parts, or a bent cage. Check them in that order using the exact model manual.
Why does the chain rub the front derailleur?
Possible causes include incorrect height or rotation, cable tension, a bent cage or chainring, cross-chaining, or a missed trim position. Do not move a limit screw until you know which condition is responsible.
Which derailleur should I adjust first?
Make sure the rear derailleur and hanger are functional before final front-derailleur testing because the rear gear changes the chain angle. The front derailleur itself should be adjusted in the model-specific order, usually position, low limit, cable, high limit, and final tension.
Bottom line
The model number and Shimano dealer manual are the starting points. On a mechanical system, verify condition and compatibility, set position before limits, route the cable correctly, and make small adjustments while testing. Stop if the chain can leave the chainrings or any structural part is bent or loose.