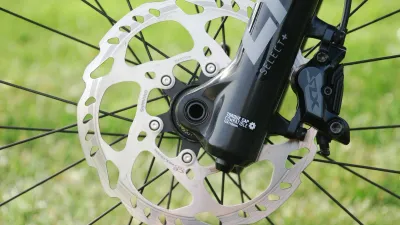
How to Install a Front Wheel with Disc Brakes
Install a front disc-brake wheel by guiding the rotor between the pads, fully seating the axle, securing it to the maker's instructions, and testing the brake.

Install a front wheel with a disc brake by guiding the rotor cleanly between the brake pads, seating the hub fully in the fork, and securing the quick release, thru axle, or axle nuts exactly as the fork and axle manufacturers direct. Then spin the wheel, apply the brake, and recheck retention before riding.
An unsecured wheel can cause a crash
Do not ride if the axle system is unfamiliar, the rotor misses the caliper slot, the wheel is not fully seated, the retention hardware is damaged, or the wheel remains loose. Never use the brake to compensate for an incorrectly installed wheel.
Prepare the bike and wheel
Stabilize the bike in a repair stand or on the ground as its maker directs. Keep fingers and oily materials off the rotor. Inspect the fork dropouts, axle, hub end caps, rotor, and caliper for damage or missing parts.
Remove the transport spacer from between hydraulic brake pads only when the wheel is ready to go in. Do not squeeze the brake lever while the rotor is absent. If the pads have closed, use the brake maker’s approved pad-spreading procedure rather than forcing the rotor between them.
Guide the rotor into the caliper
Lift the wheel into the fork while watching the rotor from above. Guide it between the brake pads without bending it. Make sure the hub end caps sit against the correct fork surfaces and that the wheel is centered.
For a thru axle, align the hub and fork holes, insert the correct axle, and tighten or close it according to the fork and axle manual. For axle nuts, install all washers in their correct positions and use the specified tightening method.
Secure a quick-release wheel
Use the quick-release manufacturer’s procedure. The lever is a cam, not a wing nut:
- With the lever open, adjust the opposite nut until the lever develops the specified resistance as it closes.
- Close the lever fully into a safe position where it cannot contact the rotor or snag an object.
- Confirm both axle ends are fully seated in the fork.
Shimano warns that a quick-release lever on the rotor side must not interfere with the rotor; if it does, stop using the wheel (Shimano road-wheel dealer manual). Do not rely on fork retention tabs to make a loosely adjusted skewer safe.
Check the brake and wheel
Spin the wheel and verify that it rotates freely, remains centered, and has no side-to-side play. Some light rotor rub may require caliper alignment, but first confirm the wheel is seated correctly.
Squeeze the brake lever several times until it feels normal. Hold the front brake and gently rock the bike to check that the axle and brake are secure. Park Tool’s wheel installation guide covers common axle systems and post-installation checks.
If the pads look thin, uneven, damaged, or contaminated during this brake check, stop and use the bike brake-pad wear inspection guide before deciding whether the brake needs model-specific service.
Take a low-speed test ride away from traffic. Stop immediately for a loose wheel, abnormal lever travel, poor braking, rotor contact, or steering movement.
If you removed the tire as well, confirm tire direction and inspect the valve stem. For a rear wheel procedure, see changing a rear tire with disc brakes. The bike tool-kit guide can help identify model-appropriate hand tools.
This article is research-based. Exact axle closure and torque requirements vary by wheel and fork.