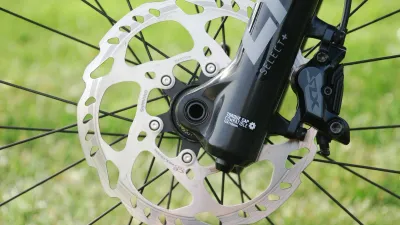
How to True a Bike Wheel
Learn how to inspect and true a bicycle wheel for lateral and radial movement, with spoke, rim, dish, and stop-service checks.
Table of Contents
- What does truing a bike wheel mean?
- Before you start
- Step 1: Inspect the wheel before measuring
- Step 2: Establish the wheel’s reference
- Step 3: Decide whether truing is appropriate
- Step 4: Understand spoke adjustment
- Step 5: Correct a small lateral deviation
- Step 6: Check radial movement without forcing the rim
- Step 7: Check dish and brake or frame clearance
- Step 8: Check spoke tension and stress
- Step 9: Finish and test the wheel
- Common truing mistakes
- Frequently asked questions
- How we researched this guide
- Bottom line
- Sources
To true a bike wheel, secure the wheel in a truing stand or the bicycle frame, identify whether the rim moves side to side or toward and away from the hub, and make small, even spoke adjustments while checking the whole wheel. The rim must remain structurally sound, the spokes and nipples must be serviceable, and the final wheel must satisfy the exact wheel, rim, hub, tire, brake, and bicycle requirements. A badly bent or cracked rim is a replacement or professional-service decision, not a spoke-adjustment project.
Stop before adjusting a damaged wheel
Do not ride or continue truing if the rim is cracked, split, sharply kinked, flat-spotted, pulled through at a nipple hole, or bent after an impact; a spoke is loose or broken in a way that leaves the wheel unstable; the hub has play; the axle will not seat; the tire bead or casing is damaged; or the wheel contacts a brake or frame heavily. Remove the wheel from service and use the maker’s instructions or a qualified wheel builder.
What does truing a bike wheel mean?
Truing corrects a rim’s position relative to the hub by changing spoke tension. Lateral trueness describes side-to-side movement. Radial trueness describes movement toward and away from the hub, sometimes called hop or roundness. A wheel can be laterally true but radially poor, or it can look round while the rim is offset from the bicycle’s center plane.
Truing is not the same as replacing a broken spoke, correcting dish, repairing a damaged rim, or setting a brake. The bike spoke tension guide explains why a visually straight rim still needs appropriate and balanced tension. The wheel dish guide explains centering over the hub and frame or fork.
Park Tool’s wheel and rim truing procedure describes using indicators to locate deviation, adjusting the appropriate spokes, and checking the wheel repeatedly (retrieved September 2, 2026). It also distinguishes a wheel that can be corrected by tension from a rim that is too badly damaged to repair safely.
Before you start
Identify the complete wheel:
- front or rear position;
- rim maker, model, material, and size;
- hub maker and model;
- spoke type, count, lacing, and nipple style;
- axle or quick-release system;
- tire and tube or tubeless setup;
- rim-brake or disc-brake use;
- wheel or bicycle service limits.
Read the rim, hub, wheel, tire, brake, and bicycle manuals. A carbon rim, an aluminum rim, a deep-section rim, an internally spoked rim, a tubeless rim, and a wheel with an unusual nipple or lacing pattern can require different tools and limits. Do not copy a spoke tension, spoke length, torque, runout, or nipple-turn instruction from another wheel.
Use a stable truing stand when possible. A bicycle frame or fork can serve as a visual holder for some checks, but it is not a substitute for a dishing tool, tension measurement, or a wheel builder when the wheel is significantly out of shape. Protect a disc rotor from tools and grease. If you remove a hydraulic-brake wheel, use the approved pad spacer and do not squeeze the lever with the wheel out.
Useful equipment can include:
- a truing stand or a stable bicycle;
- a correctly sized spoke wrench;
- a dishing tool when center alignment matters;
- a spoke tension meter with the correct conversion data;
- a tire lever and rim-safe inspection light;
- a marker or removable reference tape;
- the wheel and component manuals.
Do not use pliers on a nipple, clamp the rim, twist a bladed spoke without a holder, or force a seized nipple. A tool that fits one nipple size can damage another.
Step 1: Inspect the wheel before measuring
Clean enough dirt from the rim and spokes to see the interfaces, but keep cleaning products away from brake pads and rotor surfaces. Remove the tire only when the rim maker’s procedure allows it and when doing so improves inspection. A tire can hide a rim crack, a casing problem, or a radial low spot.
Inspect both rim sidewalls, the spoke holes, the valve hole, the rim seam if present, the nipples, and the spoke crossings. Look for:
- cracks, splits, dents, sharp bends, or a flat spot;
- a nipple pulling into or through the rim;
- a spoke that is broken, kinked, badly corroded, or crossing incorrectly;
- a nipple that is rounded, seized, or not turning with the wrench;
- signs of impact around the tire bead or disc-brake rotor;
- hub flange, bearing, axle, and end-cap movement.
Hold the wheel by the axle or use the maker-approved stand. Rock the axle gently to check for hub play only if the hub manual permits that inspection. Do not confuse bearing movement with a truing fault. If a hub, axle, rim, or spoke is damaged, stop before turning a nipple.
Step 2: Establish the wheel’s reference
Secure the wheel by its normal axle or, for a loose wheel in a stand, by the correct adapters. Make sure the rotor, cassette, tire, and valve do not contact the stand. On a bicycle, release the brake quick release or open the caliper only as its maker permits. Never create a clearance problem by moving a brake beyond its documented position.
Bring a fixed indicator close to the rim without touching it. A stand’s indicator, a clean zip tie, or another maker-approved reference can show movement, but avoid a tool that can catch a spoke or brake track. Rotate the wheel slowly in the intended direction.
Observe three separate things:
- Lateral movement: the rim approaches one side indicator and then the other.
- Radial movement: the rim approaches the indicator at one point and moves away at another.
- Center or dish: the rim is not equally positioned between the hub locknuts or the frame or fork.
Mark a short section with removable tape if a location is hard to remember. Do not put a mark on a braking surface or leave adhesive where it can contaminate a pad.
The tubeless wheel guide covers tire, rim, tape, and sealant relationships that can be mistaken for a wheel problem. A tire with a bead that is not seated can make the rim appear to hop.
Step 3: Decide whether truing is appropriate
A small, repeatable deviation in an intact rim may be a truing task. A large deviation after a crash, a sharp kink, a cracked rim, or a rim that will not hold the tire bead is not a safe beginner adjustment. Park Tool notes that a badly bent rim may not be repairable by spoke adjustment and may need professional repair or replacement.
Do not turn a general visual example into a universal runout limit. The rim, wheel, brake, and bicycle makers may specify different limits, and some wheels require a professional build procedure. If you cannot identify the maker’s limit, treat the condition as unknown and ask a qualified mechanic or wheel builder.
Also stop if:
- more than one spoke is broken;
- many nipples are loose or seized;
- the wheel has a repeating impact flat spot;
- the hub flange, axle, or bearing is damaged;
- the rim moves at the nipple holes;
- the tire or tubeless bead will not seat;
- the rotor or rim brake cannot clear safely after the wheel is seated.
Step 4: Understand spoke adjustment
Each spoke pulls the rim toward its hub flange. Tightening a spoke generally pulls the nearby rim section toward that spoke side. Loosening reduces that pull. At a lateral deviation, the correction may involve a small group of spokes on one side, the other side, or both, depending on the exact lacing and the wheel builder’s method.
The nipple’s apparent direction can be confusing when you look from the wrong side of the wheel. Use the spoke-wrench maker’s instructions and make one documented adjustment at a time. Do not assume that clockwise from the outside of the wheel always means tighter. If the nipple turns on the spoke instead of engaging its threads, stop.
For radial movement, the pattern of the high or low area and the rim design determine the safe correction. A rim with an impact flat spot may not respond to tension without excessive stress. Do not pull a carbon rim into shape with a generic pattern. Follow the rim maker’s service guidance.
For dish, both sides of a rear or dished wheel can have different normal tensions because flange position and cassette clearance differ. Equal spoke feel on both sides is not a universal goal. Measure against the wheel’s chart or use a qualified builder.
Step 5: Correct a small lateral deviation
- Note the deviation’s center and length as the wheel rotates.
- Identify the spokes attached near that rim section and note which flange they reach.
- Check that the nipple and spoke are sound and that the spoke wrench fits.
- Make a small, even adjustment permitted by the wheel maker.
- Stress-relieve only as the wheel maker or builder procedure directs.
- Rotate the wheel again and check the entire rim, not just the original spot.
Do not make a large turn because the rim did not move immediately. Spoke wind-up, friction at the nipple or crossing, and a neighboring loose spoke can hide the result. If the deviation moves to another area, tension becomes uneven, or several spokes need substantial correction, stop and measure the wheel or use a professional.
A wheel in a frame can be checked against the brake pads, but pad clearance is not a universal truing gauge. Disc-brake rotors and calipers are separate components. The rubbing disc-brake guide covers brake contact without treating it as a rim limit.
Step 6: Check radial movement without forcing the rim
A radial high or low spot can come from the rim, tire bead, rim tape, tube, tire casing, or spoke tension. First separate those causes. If the tire is installed, confirm the bead line is even and the tire is seated by its maker’s procedure. If the issue remains with the tire removed and the rim is structurally sound, compare the rim shape with the wheel instructions.
Do not tighten a whole group of spokes to erase a severe low spot or loosen spokes around a high spot until the wheel loses support. Excessive tension can damage a rim or hub, and excessive loosening can leave spokes unstable. Use a calibrated tension check and the wheel chart when available.
If a high spot is a clear impact deformation, if a low spot is a flat section, or if the rim cannot hold the tire, stop. A true-looking wheel that fails a structural inspection is not safe.
Step 7: Check dish and brake or frame clearance
A dishing tool compares the rim’s position relative to the hub centerline. For a front wheel, the rim may be centered between the hub locknuts when the wheel is correctly built. A rear wheel often has different flange spacing because of the drivetrain, so its spoke tension and dish are not copied from a front wheel.
Use the wheel dish guide for a dedicated center check. First confirm that the wheel is laterally true and that the axle, end caps, and adapters are assembled correctly. A wheel that is not fully seated can appear dished incorrectly.
After any correction, reinstall the wheel with the exact axle or quick-release procedure. Check that:
- the wheel is fully seated in the dropouts;
- the retention system is secured as specified;
- the rim is centered in the frame or fork;
- a rim brake has the intended clearance;
- a disc rotor passes the caliper without heavy contact;
- a tire and fender do not touch the frame or fork;
- the axle, hub, rotor, and cassette have no unusual movement.
The thru-axle and quick-release comparison explains why retention compatibility is part of a wheel check.
Step 8: Check spoke tension and stress
Truing by eye alone can create a wheel with an acceptable outline but poor tension. Measure with a tensiometer that is suitable for the spoke type, and use the rim or wheel maker’s conversion data. Park Tool’s wheel tension measurement guide recommends recording readings and evaluating consistency relative to the wheel’s average rather than relying on finger feel (retrieved September 2, 2026).
Check every accessible spoke, including both sides of a rear wheel. Record unusual readings, compare them with the maker’s target, and look for a pattern. Do not equalize all numbers blindly. The correct tension can differ by side, spoke, flange, rim, material, lacing, and wheel design.
After a permitted correction, rotate the wheel, inspect again, and remeasure. If the tension is high, low, or inconsistent beyond the maker’s guidance, a spoke or rim is damaged, or the nipple is seized, stop. A wheel builder can determine whether to replace spokes, re-rim the wheel, or rebuild it.
Step 9: Finish and test the wheel
Before returning the wheel to service:
- Replace the tire, tube, rim tape, tubeless tape, and valve according to their makers.
- Confirm the bead, tire direction, and inflation guidance.
- Install the wheel with its exact axle, end caps, spacers, rotor, cassette, and brake procedure.
- Check that the wheel is secure and centered.
- Rotate it slowly and inspect for lateral, radial, dish, brake, and frame clearance.
- Check brake lever feel and wheel retention while stationary.
- Make the first moving check only in a safe, clear area allowed by the makers.
Stop immediately for a loose wheel, cracked or moving rim, a spoke that goes slack, rotor or frame contact, tire bulge, bead movement, a changed brake lever, unusual vibration, or any loss of control. Do not test a repaired wheel in traffic, on a descent, on ice, or with a heavy load before it has passed a careful stationary inspection.
Common truing mistakes
| Mistake | Why it creates risk | Better approach |
|---|---|---|
| Tightening one spoke repeatedly | Can overload a spoke, nipple, or rim | Use the maker’s group-adjustment method and measure |
| Using a spoke wrench that does not fit | Rounds the nipple | Match the tool to the exact nipple |
| Treating tire wobble as rim wobble | Tire seating can imitate radial error | Inspect the tire and bead separately |
| Chasing brake noise with spoke turns | Brake and wheel faults can be unrelated | Diagnose wheel, rotor, and caliper independently |
| Copying a tension number | Rims and spokes have different limits | Use the wheel’s chart or a wheel builder |
| Truing a cracked rim | Tension cannot restore damaged structure | Remove from service and replace or repair |
| Ignoring dish | A rim can look straight but sit off-center | Use a dishing check after truing |
Frequently asked questions
Can I true a bike wheel without a truing stand?
For a basic visual check, a correctly secured bicycle can hold a wheel while a safe indicator shows movement. A stand does not remove the need for a tension meter, dish check, or maker limits. A wheel with significant deviation or damage belongs with a qualified builder.
Which way do I turn a spoke nipple?
Do not rely on a universal clockwise rule because your viewing side changes the apparent direction. Use the spoke-wrench instructions, identify the nipple side, and make a small documented adjustment. Stop if the nipple or spoke does not turn normally.
How much should I turn a spoke?
Use the smallest adjustment that the wheel or rim procedure allows, then recheck the whole wheel. A generic turn count is unsafe across rims, spoke types, nipple friction, and wheel designs.
Can a bent rim be trued?
Some small deviations in an intact rim may be corrected with tension. A cracked, sharply kinked, impact-flattened, or nipple-damaged rim may require replacement or professional repair. Use the rim maker’s limits rather than a visual guess.
Do I need to remove the tire?
Not always. The tire can hide the rim and make radial inspection difficult, while removal can introduce a bead, tube, tape, or sealant service step. Follow the rim and tire makers’ procedures and remove it when it is necessary for a safe inspection.
Why is my wheel true but not centered?
Lateral trueness and dish are different. A wheel can have little side-to-side movement yet sit off the hub or frame centerline. Check axle seating, end caps, adapters, and dish with the correct tool.
Can I ride after tightening a loose spoke?
Do not assume a single turn restores a wheel. Inspect the rim, nipple, neighboring spokes, hub, tire, brakes, and wheel retention, then verify tension and trueness. Walk the bicycle or use qualified service when the wheel is unstable or the cause is unknown.
How we researched this guide
This is research-based wheel-service guidance, not a hands-on truing, wheel-building, tension, runout, durability, or riding test. We reviewed Park Tool’s wheel truing, wheel tension, and wheel installation references and the bicycle’s component manuals on September 2, 2026. We did not invent a universal spoke tension, turn count, runout limit, dish measurement, torque value, or ride-performance result.
Bottom line
True only an intact, correctly identified wheel. Separate lateral movement, radial movement, dish, tire seating, hub play, and brake clearance. Make small maker-approved adjustments, measure tension, and stop for structural damage, severe deviation, loose or broken parts, seized nipples, or uncertainty.
Sources
- Park Tool, “Wheel and Rim Truing,” retrieved September 2, 2026, https://www.parktool.com/en-us/blog/repair-help/wheel-and-rim-truing
- Park Tool, “Wheel Tension Measurement,” retrieved September 2, 2026, https://www.parktool.com/en-us/blog/repair-help/wheel-tension-measurement
- Park Tool, “Wheel Removal and Installation,” retrieved September 2, 2026, https://www.parktool.com/en-int/blog/repair-help/wheel-removal-and-installation
- Park Tool, “Wheel Dishing and Centering,” retrieved September 2, 2026, https://www.parktool.com/en-int/blog/repair-help/wheel-dishing-centering
- Trek, “Bicycle Owner’s Manual,” retrieved September 2, 2026, https://media.trekbikes.com/image/upload/v1692651979/TK_OwnersManual_EN-US_June2023_WEB.pdf
- BikeRideReview, “Bike Tires and Tubeless Wheels,” retrieved September 2, 2026, https://bikeridereview.com/bike-tires-tubeless-wheels/