How to Patch a Bike Tire Tube Step by Step
Find the puncture, remove its cause, prepare the inner tube, apply the correct patch, and reinstall it without pinching. Tubeless tires use a different repair.

Patch a bicycle inner tube by locating and marking the puncture, inspecting the matching tire and rim area, preparing the tube exactly as the kit directs, and centering the patch over the hole. A vulcanizing patch can be a durable repair on a sound butyl tube. Many peel-and-stick patches are temporary.
This process is for an inner tube. A stick-on tube patch is not a repair for a damaged tire casing or a tubeless tire body.
Replace structurally damaged parts
Replace a tire with a damaged bead, bulge, exposed casing threads, severe cut, or cracking. Replace a tube with damage at the valve or seam. A patch cannot restore those structures.
What you need
- A patch kit approved for the tube material
- Tire levers compatible with the rim
- A pump and pressure gauge
- A marker or chalk
- A clean, lint-free cloth
- Water for leak detection when the hole is hard to find
- The wheel-removal tools required by the bicycle
Traditional patch kits are commonly designed for butyl rubber. Latex and TPU tubes need their makers’ approved patches and preparation.
Our bike tire patch-kit guide compares a vulcanizing kit, a compact temporary kit, and a separate tubeless plug tool.
1. Remove the wheel and tube
Shift to a position that makes wheel removal easier, then follow the bicycle and brake makers’ instructions. Fully deflate the tube. Release the brake only if the system requires it, and remember to restore and test it afterward.
Push both tire beads toward the rim’s center channel. Lift one bead over the rim by hand or with an approved tire lever. Avoid driving a lever deeply enough to cut the tube.
Pull the tube out, leaving the valve until last. Keep track of which side faced the tire and where the valve aligned with the wheel.
2. Find and mark the leak
Add only enough air for the tube to take shape. Listen and feel for escaping air. If needed, pass sections through water and watch for bubbles. Do not submerge a pump head or component that its maker says to keep dry.
Mark the hole before the tube deflates. Check for:
- One small tread-side hole from a thorn, wire, or glass
- Two parallel cuts from a pinch flat
- Rim-side damage from tape, a burr, or a spoke hole
- A tear near the valve from movement or poor installation
- A split at a seam or in brittle rubber
Two or more nearby bubbles may represent one irregular cut. Dry the tube fully before continuing.
3. Remove the cause
Align the tube’s valve with the rim valve hole, then map the puncture to the tire and rim. Inspect both possible directions because the tube may have been flipped during removal.
Carefully flex the casing around the matching point. Use a cloth to detect a snag instead of sliding a bare fingertip over hidden glass or wire. Inspect rim tape, spoke holes, seams, and the valve hole when the puncture faces inward.
Do not reinstall the tube until the thorn, burr, damaged tape, incorrect pressure, or installation fault is corrected. The repeated-flat diagnostic covers each puncture pattern in more detail.
4. Prepare the tube
Follow the patch instructions, because products differ. For a typical vulcanizing kit:
- Clean and dry an area larger than the patch.
- Lightly roughen only the instructed area.
- Remove dust without touching the prepared surface.
- Apply a thin, even layer of vulcanizing fluid.
- Wait for the product’s specified readiness time.
Vulcanizing fluid is not ordinary glue. More does not produce a stronger repair. Work with ventilation, keep it away from flames, and follow its handling warnings.
For a pre-glued patch, prepare the surface exactly as that maker directs. Park Tool’s inner-tube repair procedure treats its GP-2 pre-glued patch as a temporary fix and its vulcanizing method as the more durable repair.
5. Apply the patch
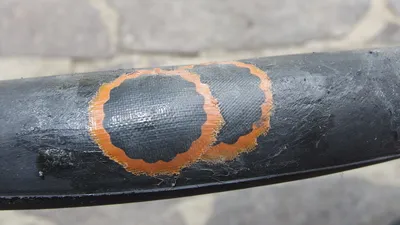
Peel the backing without touching the bonding surface. Center the patch over the marked hole and press from the center outward. Hold firm pressure for the specified time, paying attention to every edge.
Do not test adhesion by immediately lifting a corner. Allow any stated cure time. When the protective top film is meant to be removed, peel it without pulling the patch from the tube.
Inflate the tube slightly and inspect for bubbles, lifting edges, or continued leakage. Start again with a new patch or replace the tube if the repair does not seal.
6. Inspect the tire and rim again
Before installation, run the final checks:
- The sharp object is completely removed.
- The tire casing and bead are structurally sound.
- Rim tape covers the required area and lies flat.
- No spoke, burr, or rim edge can reach the tube.
- The tire and tube sizes match the rim.
- The patch does not overlap a seam, valve base, or unsuitable old repair.
A tire boot can temporarily reinforce some tread-area casing cuts to reach a safe place, but it is not a permanent repair. Replace the damaged tire.
7. Reinstall without pinching
Add enough air for the tube to hold a round shape. Insert the valve squarely, then place the tube evenly inside the tire without twisting it.
Work the bead onto the rim while keeping mounted sections in the center channel. Before inflation, push the tire inward around both sides and confirm that no tube is visible under the bead.
Inflate gradually. Watch the molded seating line on both sides and stop if the bead rises unevenly or the tube escapes. Stay within the lower pressure limit specified by the tire or rim.
When to replace instead of patch
Replace the tube when the puncture is too large for the kit, the rubber is brittle, damage reaches a seam or valve, patches overlap, or the tube does not match the tire. Replace it too if you cannot make a clean, reliable repair before a remote or high-consequence ride.
A good bonded patch may last as long as the tube, but no fixed mileage is guaranteed. See how long a bike tube patch lasts for the factors that decide longevity.
What if the tire is tubeless?
First rotate a small tread puncture downward and let sealant work. A larger tread puncture may need an approved tubeless plug. Sidewall cuts, damaged beads, large tears, and rim damage require a stop and proper inspection.
Do not insert an inner-tube patch through the tread from outside. Our tubeless installation guide explains the system, while the patch-kit roundup includes a tubeless plug option.
Bottom line
The patch is only one part of the repair. Locate the puncture, fix its cause, match the patch to the tube material, prepare the surface carefully, and reinstall the tube without trapping it. Replace the tube or tire when the damage is structural or the repair cannot be verified.
A tube patch does not repair a cut casing. Use the sidewall damage decision guide and tire replacement checklist when threads, the bead, a bulge, or widespread cracking are involved.