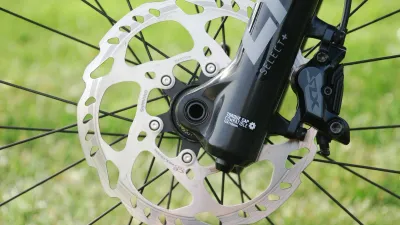
Bent Bike Brake Rotor: Fix It or Replace It?
Learn when a bent bike brake rotor can be assessed, when replacement is safer, and which wheel, caliper, and rotor checks come first.
Table of Contents
- How do you know a bike brake rotor is bent?
- Is a bent rotor safe to ride?
- What should you check before repairing the rotor?
- Can you straighten a bent bike rotor?
- When should you replace the rotor?
- How do you replace a damaged rotor safely?
- What causes a rotor to bend?
- Fix or replace: a decision table
- Frequently asked questions
- Product selection
- How we researched this guide
- Bottom line
- Sources
A bent bike brake rotor should be inspected before it is straightened or replaced. A light bend may be serviceable on some systems, but a cracked, severely deformed, loose, contaminated, or repeatedly rubbing rotor is a replacement or mechanic decision. First confirm the wheel is seated and the rub is actually at the rotor. Never use a guessed runout, thickness, torque, or rotor-size limit.
Do not ride an uncertain brake
Stop riding for a cracked or sharply damaged rotor, loose rotor hardware, a loose wheel or caliper, a lever that reaches the handlebar, a fluid leak, weak or inconsistent braking, or a rotor that remains unsafe after the exact maker procedure. Walk the bicycle or arrange qualified service.
How do you know a bike brake rotor is bent?
A bent rotor often produces a repeating scrape or tick as one part of the disc passes the pads. It may also produce vibration or a change in lever behavior, but those symptoms have other causes. Park Tool’s disc-brake rotor-truing guide says to check wheel seating, hub-bearing play, caliper alignment, cable drag, hydraulic pistons, frame mounts, and loose rotor hardware before treating the rotor as the only problem (retrieved September 2, 2026).
With the bicycle stable and the rotor cool, rotate the wheel slowly by the tire or rim. Look through the caliper without touching the rotor. A repeating contact is a reason to inspect, not proof that the disc is bent. If the wheel was recently removed, start with the disc-brake wheel installation guide and the exact axle instructions.
Is a bent rotor safe to ride?
Do not ride until the rotor and the complete brake pass a safety check. A light intermittent noise may be caused by a small deviation, but sound does not tell you whether the rotor is cracked, loose, below its maker’s minimum thickness, contaminated, or attached to a damaged hub. A severe bend can interfere with the caliper or make braking unpredictable.
Stop immediately for a crack, sharp deformation, loose bolt or lockring, contact that stops the wheel, a change in braking, vibration, fluid contamination, or a lever that feels soft or travels unusually far. The brake-pad wear guide explains why a pad fault can look like a rotor fault.
What should you check before repairing the rotor?
Use a clean, stable work area and keep fingers clear of sharp rotor edges. Turn an e-bike off and follow its maker’s battery guidance. Do not squeeze a hydraulic lever with the wheel removed. Confirm:
- the wheel is fully seated in the fork or frame;
- the thru-axle, quick release, or axle nuts are secured by the maker’s procedure;
- the hub has no abnormal play;
- rotor bolts or lockring are present and secure;
- the caliper mount and pad retainer are not loose;
- the rotor braking track is free of oil, grease, and chain product;
- the pads, spring, pin, clip, and caliper match the brake manual;
- the rotor is the approved diameter, mount style, and minimum-thickness family.
Do not use the rotor as a lever to check wheel tightness. If the axle, hub, rotor interface, caliper mount, fork, frame, or wheel has damage, stop and use a mechanic. The tubeless wheels and bike-tire guide provides broader wheel and tire inspection context.
Can you straighten a bent bike rotor?
Sometimes, but only after the brake maker’s limits and the rotor’s condition have been checked. Park Tool describes using a rotor-truing fork to move a small bend in the outer perimeter with controlled effort, then checking the rotor’s path again. Its guide also says a badly bent rotor, especially after an impact, is often best replaced and that repairability can be difficult to judge.
That is a repair concept, not a universal permission. Rotor construction, thickness, material, coating, spider design, and maker guidance differ. Do not bend the braking track with pliers, a wrench, a screwdriver, or a tool that can gouge it. Do not repeatedly flex a rotor until the rub sounds better. A rotor can look straighter while retaining a crack, sharp edge, or weakened area.
If the exact rotor instructions allow truing and the deviation is small, use the maker-approved tool and method. Work on the outer perimeter only when the instructions say it is appropriate. Keep hands and tools away from the sharp edge and braking surface. Stop if the rotor does not improve with a small, controlled correction or if you cannot see the bend clearly.
The rubbing disc-brake guide covers wheel seating, caliper, pad, piston, and rotor checks.
When should you replace the rotor?
Replacement is the safer path when the rotor is cracked, badly bent, sharply damaged, below the exact maker’s minimum thickness, contaminated beyond the maker’s approved cleaning or pad-replacement process, damaged at the bolt or lockring interface, or still rubbing after a permitted correction. Replace after an impact when the rotor’s condition cannot be assessed confidently. Do not assume a new rotor fixes a loose hub, misaligned caliper, damaged mount, or incorrectly seated wheel.
Match the replacement to the exact brake and bicycle documentation. Confirm diameter, mounting interface, thickness, six-bolt or Centerlock style, pad compound approval, adapter requirements, and minimum thickness. SRAM’s rotor overview explains that rotor size and mounting style are part of selection and that a larger diameter changes leverage and heat management (retrieved September 2, 2026). Those are system choices, not a universal upgrade recommendation.
Do not copy rotor bolts, lockring, adapter, or caliper-mount torque from a different model. The rotor-size guide addresses model-specific size and fit checks.
How do you replace a damaged rotor safely?
Follow the rotor, hub, brake, and wheel manuals together. Identify the mounting style and required tools. Remove the wheel if the procedure requires it, protect the hydraulic lever with the approved pad spacer, remove the rotor without contaminating its braking surfaces, and install the approved replacement with the documented sequence and fasteners.
Keep the new rotor in its packaging until the mounting area is clean. Do not touch the braking track with oily fingers. Do not spray an unapproved cleaner on pads, seals, or the rotor. Shimano’s hydraulic brake manual gives model-family warnings about lever operation with the wheel out, rotor condition, brake checks, and approved cleaning practices (retrieved September 2, 2026).
Reinstall the wheel using the exact axle procedure. Confirm the rotor passes through the caliper, the wheel is secured, the caliper and pad retainer are stable, and lever feel is firm and predictable. Bed in a new rotor and pads exactly as the brake maker directs. The disc-brake pad replacement tutorial covers pad identity, retainers, piston protection, and bed-in.
What causes a rotor to bend?
Direct impact, a wheel or bike transport incident, heat, abuse, loose hardware, hub play, and an incorrectly seated wheel can all contribute to rotor damage or apparent runout. A rotor can also look bent when the caliper, pad, wheel, or hub is the real source of contact.
After a crash or a hard strike, inspect the whole system: rotor, hub, wheel, axle, fork or frame, caliper, mount, pads, and lever or hose. Do not straighten a rotor while ignoring a damaged fork, dropout, hub flange, or caliper mount. A new rubbing sound after transport is a reason to inspect before riding.
Fix or replace: a decision table
| Finding | Preferred next action |
|---|---|
| Wheel is not seated or axle is not secured | Stop, reinstall using the exact wheel procedure |
| Rotor contact repeats but rotor is intact and deviation is small | Use maker limit and approved truing method, or ask a mechanic |
| Rotor is cracked, sharply damaged, or severely bent | Do not ride; replace and inspect the system |
| Rotor is below maker minimum thickness | Replace with the exact approved part |
| Rub remains after a permitted correction | Stop; replace or obtain a mechanic’s inspection |
| Hub, mount, caliper, or wheel has play or damage | Do not adjust around it; repair the underlying fault |
| Pad or rotor is contaminated | Follow maker’s replacement and cleaning instruction |
There is no safe universal number that turns a questionable rotor into a rideable one. The maker’s manual and a qualified inspection control.
Frequently asked questions
Can I bend a rotor back with pliers?
Do not use pliers or an improvised tool on the rotor. They can gouge the braking surface, create a sharper bend, contaminate the disc, or hide a crack. Use only a maker-approved truing tool and procedure when the rotor condition and service limit permit it.
Is a noisy rotor always bent?
No. Noise can come from pad contamination, caliper alignment, wheel seating, hub play, loose hardware, cable drag, sticky pistons, or wet grit. Inspect the system in that order rather than replacing a rotor based on sound alone.
Can a badly bent rotor be repaired?
A badly bent rotor is generally a replacement decision, especially after impact, but the exact maker or a qualified mechanic should assess it. Do not attempt repeated force or ride to test it. Inspect the hub, wheel, axle, fork or frame, and caliper for related damage.
Does a new rotor need new pads?
Follow the brake maker’s pad and rotor compatibility and bed-in guidance. A contaminated, damaged, or incompatible pad can compromise a new rotor. A compound change may also have model-specific rotor requirements, so do not reuse a pad by appearance alone.
How do I measure rotor thickness?
Use the rotor maker’s documented method and minimum-thickness specification for the exact rotor. Do not treat a number from another brand, rotor family, or internet chart as universal. Replace or ask a mechanic when the marking, model, or measurement is uncertain.
Product selection
These examples were selected from Bright Data Amazon listing and specification research retrieved September 2, 2026. This is not hands-on testing. A truing tool cannot establish whether a rotor is safe to straighten, so follow the rotor maker’s thickness, damage, and replacement instructions and use a qualified mechanic when the condition is uncertain.
Dedicated rotor truing tool
Park Tool DT-2.2 Bicycle Disc Brake Rotor Truing Tool
A focused option when the rotor maker's procedure allows careful adjustment
Selected from the verified Park Tool listing. Inspect the rotor and follow its exact service limits before applying force.
Best for: Riders evaluating a compatible rotor that the maker permits adjusting
Key specifications: Listing identifies steel construction and slots for rotor adjustment up to 2.5 mm thickness
Trade-off: The tool does not make a cracked, deeply damaged, or below-limit rotor serviceable
Check price on AmazonTwo-slot truing fork
Park Tool DT-2 Rotor Truing Fork
A basic truing option when the exact rotor is undamaged and serviceable
Selected from the verified Park Tool listing. Stop for uncertain damage, contamination, or rotor limits.
Best for: Riders working on a compatible rotor with minor alignment concerns
Key specifications: Listing identifies two slot depths, laser-cut steel, and a centered vinyl-dipped handle
Trade-off: A two-slot tool is not a diagnosis and cannot replace a rotor when the maker requires replacement
Check price on AmazonHow we researched this guide
This is research-based rotor guidance, not a hands-on truing, replacement, braking, heat, runout, thickness, or impact test. We reviewed Park Tool’s rotor-truing guidance, Shimano’s current hydraulic brake manual, SRAM’s rotor overview, and BikeRideReview’s wheel and pad references on September 2, 2026. We did not invent a bend, runout, thickness, torque, or replacement threshold.
Bottom line
Confirm the wheel, hub, caliper, pad, and rotor interface before blaming a bent disc. A small, permitted deviation may be assessed with the exact maker method, but cracks, severe bends, sharp damage, unknown limits, repeated rubbing, and any change in braking call for replacement or qualified inspection.
Sources
- Park Tool, “Disc Brake Rotor Truing,” retrieved September 2, 2026, https://www.parktool.com/en-us/blog/repair-help/disc-brake-rotor-truing
- Shimano, “Hydraulic Disc Brake User Manual,” retrieved September 2, 2026, https://si.shimano.com/en/pdfs/um/8VR0A/UM-8VR0A-009-ENG.pdf
- SRAM, “Rotor Overview,” retrieved September 2, 2026, https://www.sram.com/en/learn/brake-welcome-guide/rotor-overview
- Park Tool, “Wheel Removal and Installation,” retrieved September 2, 2026, https://www.parktool.com/en-int/blog/repair-help/wheel-removal-and-installation