Hub-Motor Axle and Dropout Compatibility Guide
Check hub-motor axle and dropout compatibility by measuring spacing, slot shape, axle flats, washers, torque arms, brakes, and wheel clearance first.
Table of Contents
- What are dropouts and motor axles?
- Which measurements matter before purchase?
- Step 1: Identify the bicycle’s dropout type
- Step 2: Measure spacing and slot geometry
- Step 3: Dry-fit the motor wheel with power disconnected
- Step 4: Confirm the anti-rotation and retention plan
- Step 5: Verify brakes, gearing, and wheel clearances
- Step 6: Tighten, inspect, and recheck the wheel
- Step 7: Perform a controlled first check
- Can a hub motor fit any bicycle dropout?
- Can I file the dropout to fit a hub motor?
- Do I need a torque arm?
- Common mistakes to avoid
- Frequently asked questions
- How we researched this guide
- Bottom line
- Sources
A hub motor is axle-and-dropout compatible only when the motor axle, flats, width, slot or through-hole, washers, retention hardware, brake interface, wheel, fork or frame, and motor maker’s instructions all agree. A wheel that appears to fit between the dropouts can still have an unsafe axle shape, poor seating, rotor misalignment, insufficient clearance, or no approved way to resist motor torque.
Measure before ordering and dry-fit with the battery disconnected. Do not force a motor axle into a narrow or incompatible dropout, file a structural fork or frame without explicit maker approval, rely on a single washer, or ride with a loose wheel. If the dropout material, axle force, torque arm, brake mount, or high-current wiring is uncertain, stop and ask the motor maker and a qualified bicycle technician to inspect the combination.
Start with the electric bike conversion kit guide, then read the front versus rear hub motor guide and donor-bike compatibility checklist. The wheel-size guide covers the tire and rim measurements that must be checked with the axle.
Key Takeaways
- Match dropout spacing and shape to the complete motor axle and washer stack, not just the nominal hub width.
- The axle must seat fully, resist rotation as specified by the maker, leave the wheel and brake aligned, and keep the motor cable protected.
- A torque arm is part of a documented retention plan. It is not a universal substitute for the correct dropout, axle, washer order, or qualified inspection.
What are dropouts and motor axles?
A dropout is the part of the frame or fork that holds the wheel axle. A traditional slotted dropout lets the wheel enter from the open end of a slot. A thru-axle dropout uses a hole and a specific axle that passes through the frame or fork. These interfaces are not automatically interchangeable.
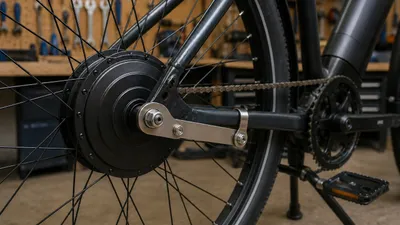
The motor axle transfers wheel and motor forces into the dropout. Its overall width, flat dimensions, shoulders, threads, cable exit, and washer arrangement determine how it seats. A hub motor may also need a torque arm or another maker-specified anti-rotation device. Grin’s compatibility guidance explains that both dropout spacing and slot shape determine which hub motors fit, and distinguishes slotted dropouts from thru-axle designs (Bike Compatibility, retrieved September 2, 2026).
Do not identify compatibility by a “front motor” or “rear motor” label alone. The fork or frame, brake, freewheel or cassette, tire, fender, axle, and motor cable must be checked as a complete system.
Which measurements matter before purchase?
Record these measurements from the bicycle and the proposed motor documentation:
| Measurement or detail | What it tells you | Why a guess is risky |
|---|---|---|
| Front or rear dropout spacing | The distance between the faces that support the hub | A few millimetres can change wheel centering, brake alignment, and retention |
| Slot width and shape | Whether the axle flats can enter and fully seat | A round or narrow slot may not resist a motor axle’s rotation |
| Axle width and flats | How the axle bears on the dropout and washers | Threads can tighten while the flats remain poorly supported |
| Axle shoulders and cable exit | Where the hub and wire sit relative to the dropout | A cable can be pinched or a hub can be offset |
| Brake interface | Rim track or disc mount, rotor position, caliper, and adapter | A wheel can seat yet leave the brake rubbing or unusable |
| Freewheel or cassette space | Rear cluster and derailleur clearance | A rear motor may conflict with the chainstay or gearing |
| Tire and rim dimensions | Wheel, fender, and frame clearance | A nominal wheel size does not specify inflated width or clearance |
| Retention hardware | Washers, nuts, torque arm, or thru-axle system | Hardware order and maker approval determine the actual load path |
Use a ruler, caliper, or gauge appropriate to the measurement. Do not measure across paint, a loose wheel, or a misaligned axle and call the result final. Record units and the reference points so the motor supplier can reproduce the check.
Step 1: Identify the bicycle’s dropout type
By the end of this step, you should know whether the donor bicycle uses slotted, thru-axle, horizontal, folding, fat-bike, tandem, or another dropout format. Remove the wheel according to the bicycle maker’s instructions and photograph the dropout from both sides.
Check:
- Front or rear position and nominal spacing.
- Open slot, closed through-hole, horizontal slot, insert, adapter, or proprietary interface.
- Material and construction, including carbon, aluminum, steel, suspension fork, or replaceable dropout hardware.
- Brake mount, derailleur hanger, fender eyelets, rack mounts, and cable-routing space.
- Axle type on the original wheel: quick release, nutted solid axle, thru axle, or another system.
Do not assume that a bicycle with a familiar wheel label uses a standard dropout. Grin notes that folding, fat, tandem, road, and internal-gear-hub bicycles can use different spacing and interfaces (Bike Compatibility, retrieved September 2, 2026). Treat a special frame as a maker or technician review item.
Step 2: Measure spacing and slot geometry
By the end of this step, you should have the bicycle dimensions and the proposed motor dimensions on the same worksheet. Measure dropout spacing between the inner faces with the wheel removed. Measure slot width and the depth and orientation of the flat-bearing surfaces without forcing a tool into the slot.
Compare the motor’s axle width, flat width, shoulder, thread length, and cable exit with the bicycle. Confirm whether the maker permits the proposed washers, spacers, adapters, and torque arm. Do not rely on nominal “100 mm front” or “135 mm rear” wording if the motor document gives a different axle or rotor position.
If the motor is for a thru-axle frame or fork, use only the exact adapter or axle system the maker documents. A solid axle with nuts is not a drop-in replacement for a thru axle, and a quick-release skewer is not a substitute for a motor axle’s retention hardware.
Step 3: Dry-fit the motor wheel with power disconnected
By the end of this step, the wheel should sit fully and symmetrically without force, cable strain, or contact. Remove or isolate the battery and keep the controller unpowered. Route the motor cable in the intended direction before tightening anything.
Insert the axle only as far as it goes by hand. Verify that both axle flats are fully within the approved dropout surfaces, the axle shoulders meet the correct faces, and the wheel is centered. Install washers, torque arm parts, spacers, and nuts in the maker’s stated order for the exact motor and frame. Do not hammer, pry, spread, bend, or file the bicycle to make an uncertain fit.
Check that:
- the tire and rim are centered in the fork or frame;
- the rotor or rim-brake track aligns with the caliper or pads;
- the freewheel or cassette and derailleur clear the chainstay;
- the motor cable exits without a sharp bend, pinch, or contact with the rotor;
- fenders, racks, guards, spokes, and frame tubes clear the hub;
- the axle threads have the maker-specified engagement after the washers are installed.
Grin’s guide documents separate checks for rotor alignment and caliper clearance on hub motors (Bike Compatibility, retrieved September 2, 2026). A wheel that is centered but has a wrong rotor position is not ready to ride.
Step 4: Confirm the anti-rotation and retention plan
By the end of this step, the motor maker’s retention method should be documented. Motor torque can try to rotate a solid axle in a slotted dropout. The required response depends on motor torque, axle design, dropout material and shape, washer faces, frame or fork, and maker instructions.
Grin’s torque-arm documentation explains that hub-motor axle forces can be substantial and provides product-specific guidance for matching an arm to the motor and bicycle (Torque Arms, retrieved September 2, 2026). Do not copy a torque-arm shape, bolt location, or washer stack from a photograph or another motor.
Ask these questions:
- Does the motor maker require one or two torque arms for this axle and use?
- Does the arm fit the actual dropout, fork blade, frame tube, eyelet, or adapter without drilling or crushing a tube?
- Is the clamp or bolt arrangement approved for the material and shape?
- Do the axle washers and nuts remain in the maker’s order with the arm installed?
- Does the arm leave brake, tire, fender, cable, and suspension clearance?
- Can the wheel be removed and reinstalled without losing the approved alignment?
The existing torque-arm guide explains the purpose and stop conditions. A torque arm does not repair a dropout that is cracked, distorted, too narrow, or incompatible with the axle.
Step 5: Verify brakes, gearing, and wheel clearances
By the end of this step, the installed motor wheel should preserve the bicycle’s brake and drivetrain interfaces. With power disconnected, rotate the wheel slowly and inspect the rotor, caliper, spokes, tire, freewheel or cassette, derailleur, chainstay, fork, fender, and motor cable.
For a disc brake, confirm rotor thickness, diameter, mount, adapter, caliper, and spoke clearance using the brake maker’s compatibility document. For a rim brake, confirm the rim brake track, pad position, sidewall condition, and caliper reach. The brake-upgrade guide covers the separate question of braking capacity when the conversion changes mass or speed.
For a rear motor, shift through the permitted gears without power. Confirm that the freewheel or cassette is tight, the derailleur does not contact the spokes or tire, and the chainline remains acceptable. The conversion chainline guide explains how a rear cluster or mid-drive change can expose a drivetrain problem.
Step 6: Tighten, inspect, and recheck the wheel
By the end of this step, the wheel should be installed using the maker’s fastener sequence and specification, with a written inspection record. Use the correct tool and do not substitute a generic torque value for an exact motor, axle, washer, or torque-arm instruction.
Before connecting the battery, check:
- Wheel center, tire clearance, and full axle seating.
- Washer, spacer, torque-arm, nut, and adapter order.
- Brake alignment and lever operation.
- Freewheel or cassette, derailleur, chain, and chainstay clearance.
- Motor-wire routing and connector protection.
- Fork or frame cracks, deformation, paint movement, or contact marks.
If a high-current connector, battery lead, controller, or motor wire needs repair or modification, have a qualified technician perform the work according to the maker’s limits. Do not power a wheel that can move in the dropout or whose cable may contact a rotating part.
The conversion waterproofing guide covers connector protection and controller placement. If a cable or connector shows heat, odor, melting, or intermittent power, use the conversion overheating guide and have the complete electrical system inspected.
Step 7: Perform a controlled first check
By the end of this step, you should know whether the bicycle remains mechanically stable at low demand. Start with the battery disconnected and roll the bicycle while applying each brake gently. Then, only after the unpowered checks pass, use the lowest practical assist in a controlled, legal area with no traffic, passenger, steep descent, or loose surface.
Stop immediately for axle movement, wheel pull, rotor rub, cable strain, sudden brake change, crack, clicking from the dropout, or a torque arm that shifts. Recheck the wheel and hardware after the first short check. A successful low-speed roll does not approve maximum power or a high-load route.
Can a hub motor fit any bicycle dropout?
No. Some hub motors have adapters for several documented interfaces, but the actual fit still depends on spacing, slot shape, axle, brake, wheel, tire, freewheel or cassette, cable, and retention hardware. Grin’s compatibility guide lists common and specialized examples, but a different manufacturer’s motor or bicycle needs its own instructions (Bike Compatibility, retrieved September 2, 2026).
If the seller cannot provide axle dimensions and a compatibility answer for your bicycle, do not order on the assumption that a few washers will solve it.
Can I file the dropout to fit a hub motor?
Do not file a fork, frame, or dropout unless the bicycle and motor makers explicitly permit the exact modification and a qualified technician evaluates it. Removing material can change axle support, retention, brake alignment, and structural strength. A motor supplier may document a narrow, product-specific fit procedure, but that is not a universal instruction.
Do I need a torque arm?
The answer depends on the motor axle, torque, dropout, material, shape, washer stack, and maker instructions. A torque arm may be required, recommended, or unsuitable for a particular frame or fork. Follow the exact motor maker’s retention plan and have a technician inspect an uncertain installation.
Common mistakes to avoid
Measuring only hub width
Hub width does not describe axle flats, shoulders, rotor position, cable exit, washers, or dropout shape. Record the complete axle and interface.
Tightening nuts before the axle is seated
Nuts can clamp a misaligned wheel while the axle flats remain partly supported. Insert and seat the axle by the documented method before tightening.
Replacing a torque arm with a larger washer
A washer can distribute clamping load but may not provide the anti-rotation function the maker requires. Use the specified retention hardware.
Ignoring the motor cable
A cable trapped against the rotor, tire, fork, or dropout can fail while the wheel is moving. Route and protect it before power is connected.
Treating a front and rear motor as equivalent
Front forks, rear frames, brake mounts, freewheels, cassettes, derailleurs, and load paths differ. Use the correct front or rear compatibility information.
Frequently asked questions
What dropout width fits most hub motors?
Many hub motors are offered for common front or rear spacing, but there is no universal fit. Confirm the exact motor’s axle width, flat shape, rotor or freewheel position, and the bicycle’s measured dropout and brake interfaces.
Are thru-axle bikes compatible with conversion hub motors?
Only when the motor maker documents an adapter or axle system for that exact thru-axle size, fork or frame, brake, and wheel. A generic solid axle or quick-release setup is not an automatic substitute.
Can I use a torque arm on a carbon fork?
Do not assume that a torque arm makes a carbon fork compatible. Follow the fork maker, motor maker, and torque-arm maker’s instructions, and obtain a qualified inspection before installing a hub motor in an uncertain material or dropout design.
What if the rotor does not line up after the wheel is seated?
Stop. Do not ride, bend the caliper, remove retention hardware, or add random spacers. Check the motor’s rotor position, axle washers, brake adapter, dropout seating, and wheel specification against the maker’s documentation or have a technician resolve the mismatch.
Is a quick-release skewer enough to hold a hub motor?
Do not use a bicycle quick-release skewer as a substitute for the motor maker’s axle nuts, washers, thru axle, or torque-arm system. Follow the complete retention instructions for the motor and bicycle.
How we researched this guide
This is research-based compatibility guidance, not a wheel installation, torque measurement, destructive frame test, or hands-on conversion. DataForSEO research on September 2, 2026 showed compatibility and dropout questions alongside forum and product results. We used Grin’s current compatibility and torque-arm documentation plus the existing BikeRideReview safety guides, and we did not assign a universal dropout width, torque-arm requirement, axle load, or modification procedure.
Bottom line
Measure the bicycle’s dropout and brake interfaces, compare them with the exact motor axle and washer documentation, dry-fit without power, verify anti-rotation and cable protection, and inspect the brakes and drivetrain before riding. If the axle does not seat fully or the retention plan requires guessing, filing, bending, or random spacers, stop and use a qualified technician or a different documented motor.
Sources
- Grin Technologies, “Bike Compatibility,” retrieved September 2, 2026, https://ebikes.ca/resources/getting-started/bike-compatibility.html
- Grin Technologies, “Torque Arms,” retrieved September 2, 2026, https://ebikes.ca/product-info/grin-products/torque-arms.html
- Grin Technologies, “Ebike Parts Explained,” retrieved September 2, 2026, https://ebikes.ca/resources/getting-started/ebikes-parts-explained.html
- Shimano, “Manuals and Technical Documents,” retrieved September 2, 2026, https://si.shimano.com/en/manual
- U.S. Consumer Product Safety Commission, “CPSC Urges Consumers to Not Buy or Use Universal Chargers with Micromobility Products Due to Fire Hazard,” retrieved September 2, 2026, https://www.cpsc.gov/Newsroom/News-Releases/2024/CPSC-Urges-Consumers-to-Not-Buy-or-Use-Universal-Chargers-with-Micromobility-Products-Due-to-Fire-Hazard