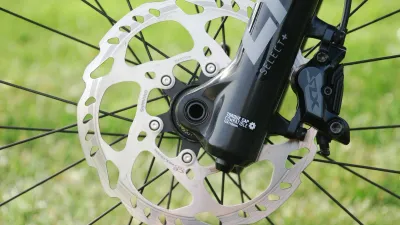
How to Bed In Bike Disc Brakes
Bed in new bike disc brake pads and rotors with the exact maker procedure, a controlled route, gradual checks, and clear stop conditions.
Table of Contents
- What does bedding in bike disc brakes do?
- Before you begin
- Step 1: Confirm the installation
- Step 2: Check lever feel and low-risk control
- Step 3: Follow the maker’s gradual slowing sequence
- Step 4: Check the changing brake
- Step 5: Complete the procedure and inspect
- What should success look like?
- Common bed-in mistakes
- Frequently asked questions
- How we researched this guide
- Bottom line
- Sources
To bed in bike disc brakes, install the correct pads and rotor, confirm the wheel and brake are secure, then use the exact brake maker’s controlled slowing procedure in a flat, clear area. The process allows compatible pad material to transfer evenly to the rotor. It is not a maximum-stop test, a race, or a universal repetition or speed rule.
Choose a controlled place and stop early
Do not bed in brakes in traffic, on ice, on a steep descent, near pedestrians, or where you cannot safely stop. Stop immediately for weak or changing braking, a soft lever, a lever that reaches the handlebar, vibration, a leak, a loose wheel or caliper, a cracked or badly bent rotor, contamination, or unexpected noise.
What does bedding in bike disc brakes do?
Bed-in is a controlled process that brings compatible pad and rotor surfaces together gradually. SRAM explains that the process creates an even pad-material layer and helps braking consistency in its rotor overview (retrieved September 2, 2026). New pads or a new rotor can feel different as that layer develops.
Bed-in does not repair a wrong pad, contaminated surface, loose wheel, damaged rotor, leaking hydraulic system, misaligned caliper, or unsafe bicycle. Fix those conditions first. The bike disc-brake pad wear guide helps identify wear and contamination before a new-pad procedure.
Before you begin
Read the exact manuals for the brake, pads, and rotor. Record the model and pad compound. Confirm that the replacement pad, rotor diameter, thickness, mount, and caliper are approved together. Some brake makers require a specific bed-in sequence and may publish a separate procedure for a model family.
Prepare:
- a flat, dry, traffic-free area with a clear escape route;
- a correctly seated wheel and secured axle;
- firm and normal front and rear lever feel;
- clean, uncontaminated pads and rotor;
- a helmet and any equipment required for the planned ride;
- the exact brake maker’s instructions.
Allow new parts and the bicycle to reach normal ambient conditions. Do not invent a temperature, speed, stopping distance, cooling period, or number of repetitions. If the rotor or caliper is hot from earlier riding, wait until it is safe to handle.
If the wheel has been removed, use the front-wheel disc-brake installation guide and the exact axle instructions. Never squeeze a hydraulic lever with the wheel or approved pad spacer removed.
Step 1: Confirm the installation
Start with a stationary inspection. The wheel must be fully seated in the fork or frame, and the thru-axle, quick release, or axle nuts must be secured by the bicycle maker’s procedure. The rotor must pass through the caliper without force. Check the caliper, rotor hardware, pad retainer, pads, springs, cable or hose, and lever.
Do not bed in a brake that rubs heavily or has a changed lever. The rubbing disc-brake guide covers wheel, caliper, pad, piston, and rotor checks.
On an e-bike, turn the drive system off and follow the bicycle maker’s battery instructions before a wheel or brake inspection. Motor assistance cannot compensate for a brake fault.
Step 2: Check lever feel and low-risk control
With both wheels installed, operate each brake lever gradually. The lever should feel firm and predictable for that brake, and it should return normally. Check that a cable or hose is routed safely and that no fluid is leaking. Confirm that the wheel is retained and that the rotor and caliper do not move.
Walk the bicycle a short distance in the selected area and apply each brake gently as the maker permits. This is an installation check, not the bed-in itself. If either brake feels weak, grabs, pulses, rubs continuously, or changes lever travel, stop and diagnose it.
Do not test with one hand on the phone, with a passenger, in a group, or on an unfamiliar descent. A bed-in route should let you stop and dismount without creating a hazard.
Step 3: Follow the maker’s gradual slowing sequence
Follow the exact procedure in the brake manual. As one model-family example, Shimano’s hydraulic disc-brake user manual describes a flat safe area, moderate speed, using one lever at a time to slow to walking speed, and repeated front and rear applications (retrieved September 2, 2026). Shimano also states that the braking force changes during bed-in.
That example is not a universal count or speed. SRAM directs riders to the brake manual and its own support procedure for the exact brake. A different rotor, pad compound, brake family, bicycle, or surface can require different instructions.
Use this sequence:
- Enter the clear area at a controlled speed allowed by the exact manual.
- Apply the specified brake smoothly and slow in a straight, stable line.
- Release as directed and allow the bicycle to roll or cool as the manual says.
- Repeat only as many times and in the order the maker specifies.
- Monitor lever feel, sound, vibration, rotor contact, and control after every application.
Never drag a brake continuously down a hill to imitate a procedure. Do not lock a wheel, make a maximum stop, or use a public road as the test area.
Step 4: Check the changing brake
New brakes can change feel during the process. Stop in the clear area and inspect without touching a hot rotor. Confirm that the wheel is still retained, the caliper and rotor are stable, and the lever has not moved closer to the handlebar.
Watch for:
- a new or worsening scrape;
- pulsing or vibration;
- a lever that feels soft or travels farther;
- a fluid leak or damaged hose;
- a pad retainer, caliper, rotor bolt, or axle that is loose;
- a sharp rotor edge, crack, severe bend, or contamination;
- braking that does not slow the bicycle normally.
Any of these is a reason to stop. Do not continue repetitions to see whether the symptom disappears. The bike-brake squeal guide covers noise causes separately, but squeal with weak or changed braking is not a normal bed-in target.
Step 5: Complete the procedure and inspect
Finish only the exact sequence in the maker instructions. Some procedures specify separate front and rear work, a cooling phase, or a final check. Do not add a guessed final maximum stop. When the brake is cool enough to inspect, check the rotor, pad surface, caliper, retainer, wheel, axle, cable or hose, and lever.
If the rotor remains contaminated, pads are damaged, the rotor is cracked or badly deformed, or the brake is weak, stop and replace or service parts according to the maker. A new pad cannot safely bed onto a contaminated surface.
The disc-brake pad replacement tutorial covers model identification, piston protection, retainer checks, and installation. Use the rotor-size guide when the rotor itself is the compatibility question.
What should success look like?
After the exact procedure, both brakes should have the normal lever feel for that system, the wheel should remain secure, the rotor and caliper should be stable, and braking should be predictable in a cautious check. The rotor may show the surface change expected by the maker, but visual appearance alone does not prove that the bed-in is complete.
Use the tubeless wheels and bike-tire guide to keep the wheel, tire, and axle checks connected. A brake can feel fine on a stand while a loose wheel, low tire, slippery surface, or poor visibility creates a riding hazard.
Common bed-in mistakes
Using a 30-30-30 rule copied from another brake
Internet procedures may mention a fixed count or speed. Do not apply one brake maker’s numbers to another brake. Use the exact manual and treat any example here as a process shape, not a specification.
Bedding in on a public descent
A long hill can make speed and heat difficult to control. It also leaves no safe margin for a new brake with changing feel. Use a flat, empty area permitted by the maker, and stop if the environment changes.
Continuing after a symptom
Noise, vibration, a lever change, a leak, or a loose part is not a reason to complete the set. Stop, cool the bicycle, and inspect or arrange service.
Touching the rotor to check heat
Rotor edges can be sharp and surfaces can be hot. Wait until it is safe and use the maker’s inspection guidance. Do not put fingers near a moving rotor.
Bedding incompatible or contaminated parts
Pad shape is not enough. Confirm the pad code, compound, rotor, caliper, and mount. Follow the maker’s replacement or cleaning instruction if oil, grease, or chain product reached the braking surface.
Frequently asked questions
Do new bike disc brakes need to be bedded in?
Follow the brake maker’s procedure whenever its instructions require bed-in for new pads, rotors, or a brake system. The process helps establish the pad and rotor interface. It does not make a damaged, contaminated, loose, or incompatible brake safe.
How long does bike-brake bed-in take?
There is no universal time, speed, count, or stopping distance. Use the exact manual for the brake and rotor, then stop when the procedure and final safety checks are complete. Do not extend a procedure because the brake feels different or shorten it because the lever feels acceptable.
Can I bed in brakes in the rain?
Do not choose a wet or low-traction route unless the exact maker procedure and the environment make it safe. Wet roads can reduce tire traction and braking performance. A flat, dry, traffic-free area gives you more control, but it cannot make an unsafe brake safe.
Should I use the front and rear brakes together?
Use the order and one-lever or two-lever method in the exact maker procedure. Shimano’s example uses one lever at a time for its specified process. Do not infer a universal front-to-rear rule from another brake family.
What if the brakes still squeal after bed-in?
Stop if squeal comes with weak braking, vibration, contamination, a leak, or a changed lever. Otherwise inspect pads, rotor, wheel seating, caliper, hardware, and the maker’s procedure, including the noise categories described above.
How we researched this guide
This is research-based bed-in guidance, not a ride, stopping-distance, heat, rotor-transfer, or brake-performance test. We reviewed Shimano’s current hydraulic user manual, SRAM’s brake and rotor guidance, Park Tool’s pad-service references, and BikeRideReview’s wheel and brake articles on September 2, 2026. We did not invent a universal speed, repetition count, temperature, distance, or completion threshold.
Bottom line
Bed in disc brakes only after the correct parts are installed and the complete brake passes a stationary safety check. Use the maker’s gradual slowing procedure in a clear, flat area, monitor every change, and stop for any loss of braking, abnormal lever feel, leak, damage, loose hardware, contamination, or unsafe route.
Sources
- Shimano, “Hydraulic Disc Brake User Manual,” retrieved September 2, 2026, https://si.shimano.com/en/pdfs/um/8VR0A/UM-8VR0A-009-ENG.pdf
- SRAM, “What is the bed-in procedure for SRAM brakes?,” retrieved September 2, 2026, https://support.sram.com/hc/en-us/articles/5927338428571-What-is-the-bed-in-procedure-for-SRAM-brakes
- SRAM, “Rotor Overview,” retrieved September 2, 2026, https://www.sram.com/en/learn/brake-welcome-guide/rotor-overview
- Park Tool, “Disc Brake Pad Removal & Installation,” retrieved September 2, 2026, https://www.parktool.com/en-us/blog/repair-help/disc-brake-pad-removal-installation