
How to Size a Bike Chain Without Guessing
Size a bike chain with the method specified for your drivetrain. Learn the large-to-large and single-speed methods, then verify suspension movement and shifting.
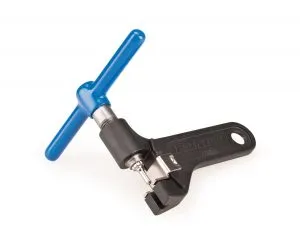
Use the chain-sizing method specified by the drivetrain manufacturer, because the number of links added after wrapping the chain varies by drivetrain. For many derailleur systems, the starting check is a chain routed around the largest chainring and largest rear sprocket without passing through the derailleur. For a single-speed bike, start with the wheel or dropout adjustment at its shortest-chain position and size around the chainring and rear cog.
Do not copy the old chain’s length unless you know it was correct.
Before cutting the chain
Confirm all of these first:
- the replacement chain matches the drivetrain’s speed and component family;
- the chainring, cassette or freewheel, and derailleur are installed;
- the exact manufacturer sizing instructions are available;
- the rear suspension position required by the bicycle maker is known;
- any master link, connecting pin, or reusable-link rule is understood;
- you have a compatible chain tool and enough uncut chain to repeat the measurement.
A chain that is too short can damage the derailleur, drivetrain, or frame when shifted into a large combination or when suspension compresses. A chain that is too long can shift poorly, slap the frame, or lose tension.
Derailleur bike: the large-to-large method
This is a general workflow, not a replacement for the exact manual.
- Shift or position the drivetrain so you can route the uncut chain around the largest front chainring and largest rear sprocket.
- Bypass the rear derailleur for the sizing wrap unless the manufacturer says otherwise.
- Pull the chain ends together snugly without forcing them.
- Find the first overlap where the correct inner and outer link ends can be joined.
- Add the exact number and type of links specified for your drivetrain.
- Mark the cut point, then count and check it again before using the chain tool.
Select a chain breaker from an exact compatibility list before cutting; a broad speed range does not guarantee every joining operation.
- Route the chain correctly through both derailleur pulleys and join it with the specified connector.
SRAM’s current chain manual, for example, uses different additions for different road, 1x, and bicycle configurations. Shimano dealer manuals also vary by drivetrain generation. That is why a universal “add two links” rule is not safe enough on its own.
Check the current SRAM chain user manual or the exact Shimano dealer manual for the installed components.
Single-speed and fixed-gear sizing
After choosing chain length, tension a one-cog drivetrain at its tightest point rather than using chain length to force a bind-free adjustment.
Set a sliding dropout, eccentric bottom bracket, or other chain-adjustment system at the bicycle maker’s shortest-chain position. Route the chain around the chainring and rear cog, pull the ends together, and choose the shortest joinable length that still leaves useful adjustment travel.
SRAM’s single-speed instructions allow adding up to one inner and one outer link after the direct wrap, while also directing riders to the frame manufacturer’s instructions. The bike’s dropout and tensioning design still controls.
After joining the chain:
- rotate the cranks through several full turns;
- find the tightest point in the chainring and cog rotation;
- set slack or tension to the bicycle and hub maker’s specification;
- verify that the wheel remains centered and axle hardware is secured;
- confirm that the chain does not bind, derail, or contact the frame.
Our single-speed gear-ratio guide helps you choose compatible gearing before committing to chain length. A conversion also needs correct chainline, hub retention, brakes, and frame compatibility.
Full-suspension bikes need a chain-growth check
Rear suspension can increase the distance between the chainring and rear axle as it moves. A chain that appears long enough at normal ride height may become dangerously short near maximum chain growth.
Follow the bicycle or frame maker’s specified suspension position and air-spring or shock procedure. If the instructions require disconnecting or compressing the shock, have a qualified mechanic do it. Keep hands clear of pivots and pinch points, and never exceed the shock or frame procedure.
After sizing, move the suspension through its approved range while checking the largest permitted gear combination. The rear derailleur must retain travel and must not be pulled to its mechanical limit.
How to count links correctly
A bicycle chain alternates inner and outer links. A complete one-inch pitch pair contains one inner and one outer link, but manufacturers and mechanics may use “link” differently when describing individual half-inch sections.
Avoid ambiguity:
- Lay the new chain beside the marked section.
- Identify whether the connector requires inner-link ends.
- Count each half-inch link at the rivets.
- Confirm the final end types before cutting.
- Leave the chain uncut if the count or connector orientation is uncertain.
Most modern quick links join two inner-link ends. Do not remove a rivet until you have confirmed that the remaining ends match the approved connector.
Why matching the old chain can fail
The previous chain may have been:
- sized incorrectly;
- used with different chainrings or cassette sprockets;
- measured with a different derailleur;
- modified after damage;
- counted by physical length after wear;
- installed before a frame, wheel, or suspension change.
An old chain is useful as a reasonableness check only after the new chain is sized from the current component instructions.
Final verification
Before joining the sized chain, verify the connecting link’s exact chain family, direction, and reuse rule.
Before riding, verify that the chain is routed through the derailleur cage correctly and that the connector is fully seated. On a repair stand, slowly test every permitted gear. Do not force a shift if the derailleur approaches its limit or the drivetrain binds.
For a derailleur bike, check both large-chainring/large-sprocket and small-chainring/small-sprocket behavior when those combinations are permitted by the maker. For a single-speed or fixed-gear bike, check tension at the tightest rotation point and confirm axle retention.
Start with a low-load test in a traffic-free area. Stop for skipping, binding, unusual noise, a stiff link, poor shifting, loss of tension, or contact with the frame. Our chain-cleaning guide and chain-lube guide cover care after the fit is correct.
Frequently asked questions
If a correctly sized chain jumps during hard pedaling, diagnose wear, indexing, tooth condition, stiff links, and hub engagement before riding.
Can I size every derailleur chain by adding two links?
No. The required addition varies with the drivetrain and bicycle. Use the exact chain, derailleur, and bicycle manufacturer’s current method.
Should I count links or measure chain length with a ruler?
Count the alternating inner and outer links and confirm the required end types. Overall length can mislead when comparing a worn chain with a new one.
Can I remove one link if the chain is slightly long?
Not one half-inch section by itself when the approved connector requires two inner ends. Chain construction and connector rules determine which sections can be removed.
Bottom line
Size from the installed drivetrain and its current manual, not from a generic number or an unverified old chain. Wrap the chain in the specified configuration, add the manufacturer-required links, confirm connector orientation, and verify every gear or tension position before applying riding load.
